Care for an Orchid Plant Orchids have a reputation for being difficult houseplants, but the real challenge is usually understanding what their roots and leaves are telling you. An orchid may look healthy for weeks and then suddenly develop yellow leaves, limp foliage, wrinkled roots, or a flower spike that stops producing blooms.
The good news is that orchid care becomes much easier once you stop treating it like an ordinary potted plant. Many popular orchids, especially Phalaenopsis, naturally grow as epiphytes, meaning they attach themselves to trees rather than growing in dense soil. Their roots need both moisture and access to air.
Learning how to care for an orchid plant is therefore less about following a rigid watering schedule and more about creating the right balance of light, moisture, airflow, temperature, and humidity. This guide explains what an orchid needs, how to water it correctly, when to repot it, and how to diagnose the most common problems.
Quick Answer
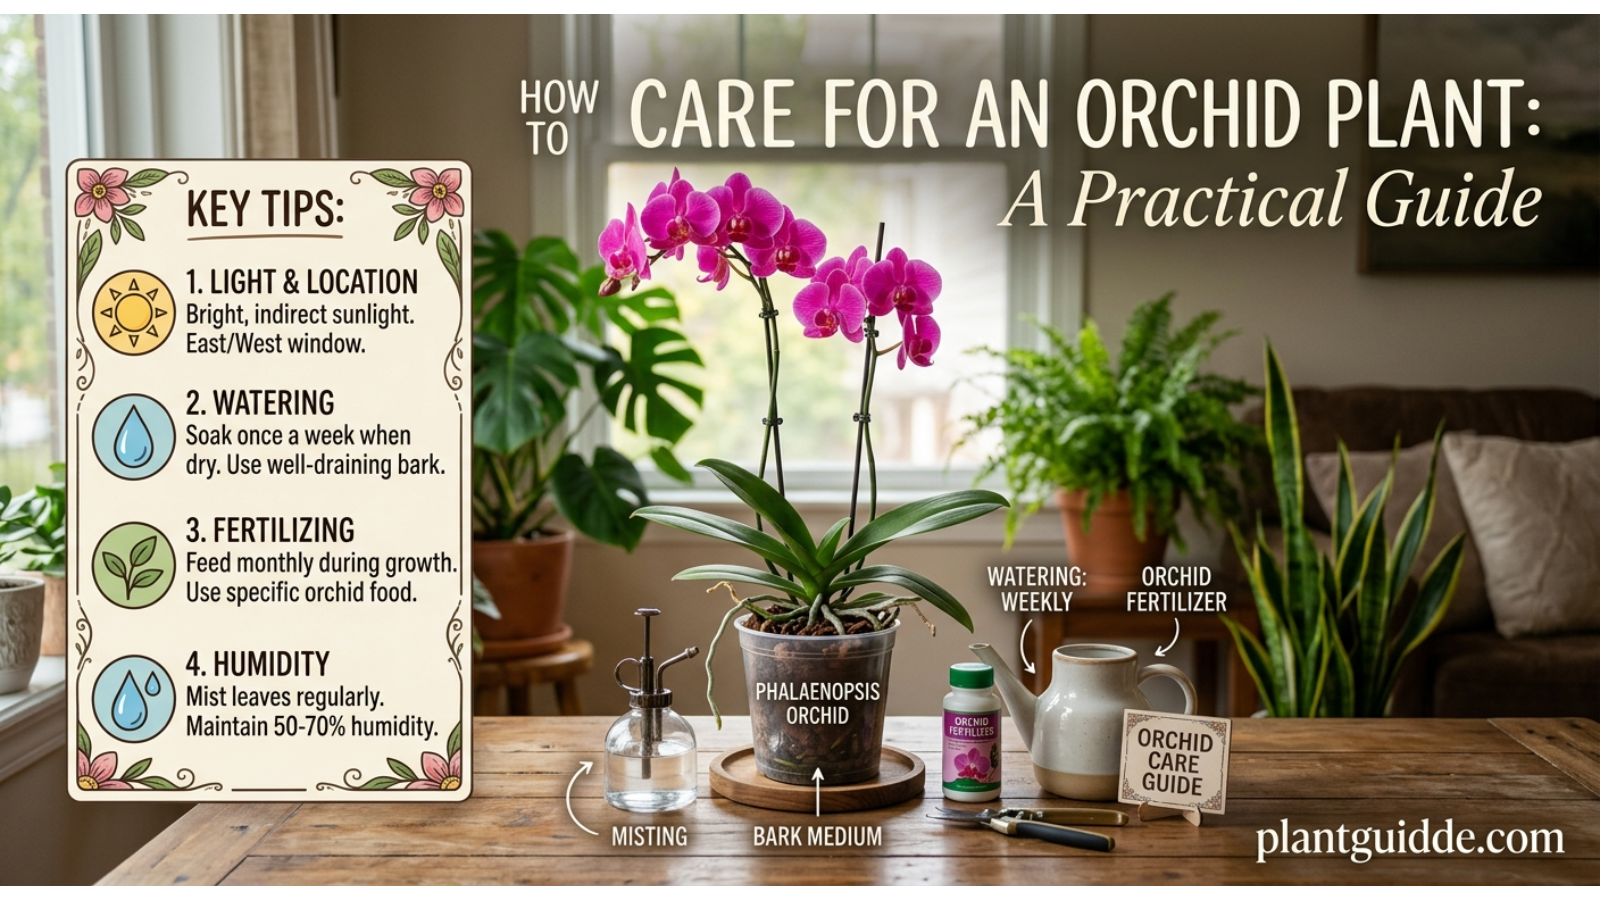
To care for an orchid plant successfully, give it bright indirect light, a well-draining orchid potting mix, thorough watering followed by partial drying, moderate humidity, good airflow, and suitable temperatures. Most common problems come from too much water, inadequate light, or poorly drained roots. Phalaenopsis orchids are particularly beginner-friendly when these basic conditions remain consistent.
What Does an Orchid Plant Need to Grow Well?
A healthy indoor orchid generally needs five things:
- Bright, indirect light
- A loose, well-draining growing medium
- Thorough watering with adequate drainage
- Moderate humidity and good airflow
- Stable temperatures without severe fluctuations
The exact requirements vary among orchid types. A Phalaenopsis orchid, for example, has different preferences from many highland orchids or orchids that require cooler nights.
For beginners, identifying the orchid before changing its growing conditions is one of the most useful steps you can take. The plant tag, flower shape, leaf structure, or nursery label can often tell you which growing conditions are appropriate.
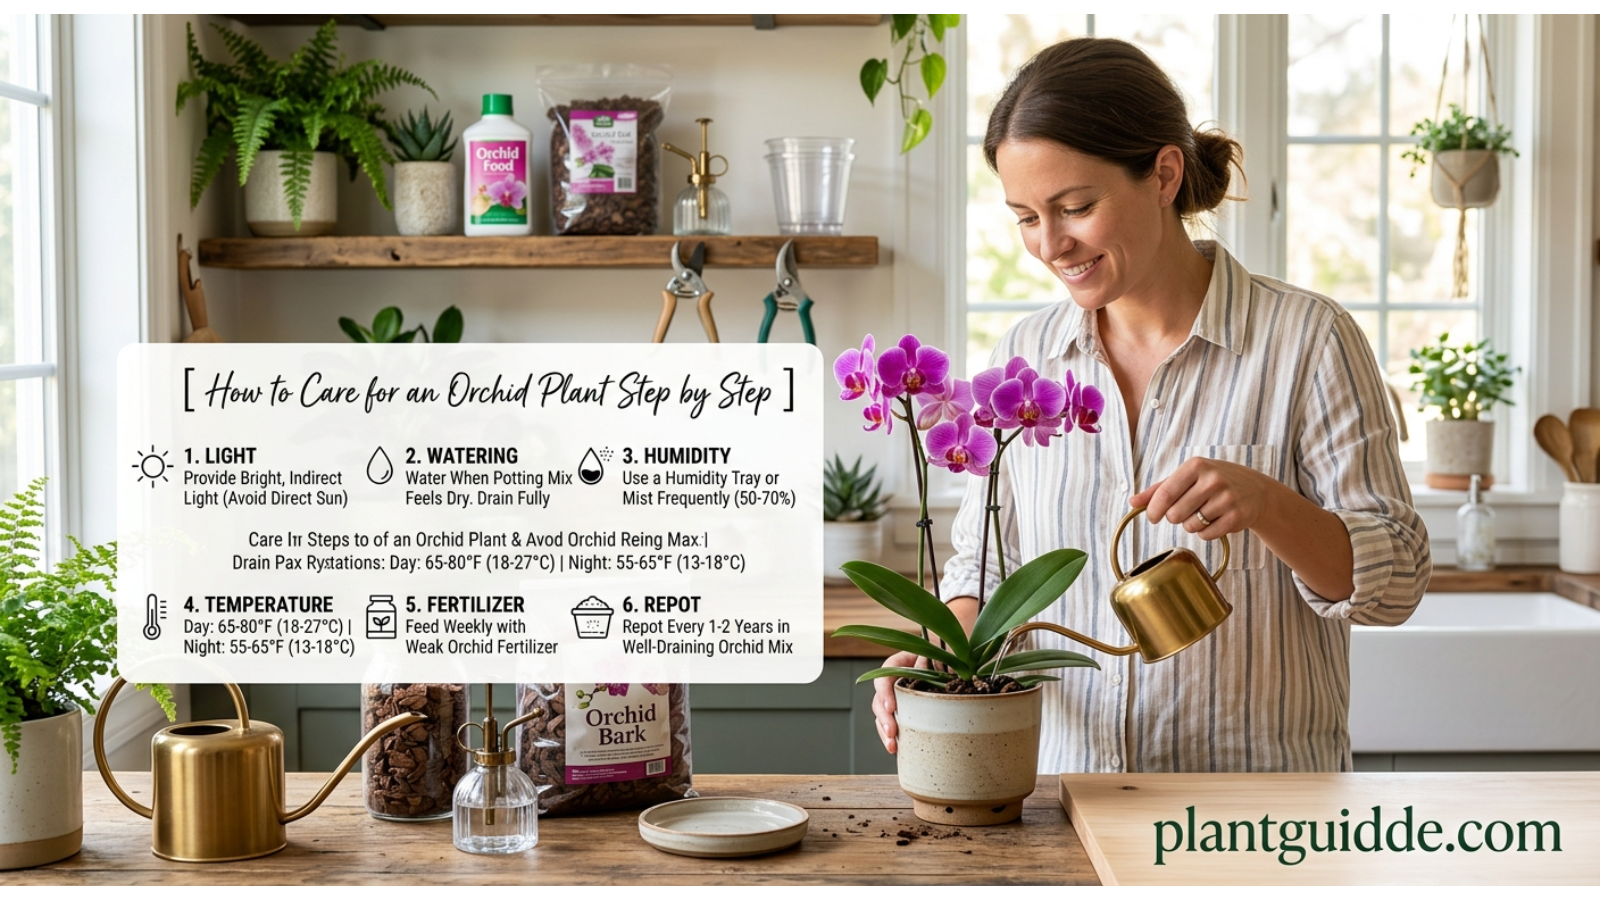
How to Care for an Orchid Plant Step by Step
1. Give Your Orchid the Right Light
Light is one of the biggest factors affecting orchid health and flowering.
Most common indoor orchids prefer bright, filtered or indirect light rather than intense midday sunlight. An east-facing window can work particularly well because it provides gentle morning light. A bright south- or west-facing window may also work if the orchid is protected from harsh direct sun.
Too little light can result in:
- Dark green leaves
- Weak or stretched growth
- Poor flowering
- Long periods without new blooms
Too much intense sunlight can cause:
- Pale or yellow-green leaves
- Bleached patches
- Brown or scorched areas on the foliage
A useful practical test is to look at the leaves rather than relying entirely on the calendar or window direction. Healthy foliage should generally appear firm and green, while the exact shade varies somewhat by orchid and growing conditions.
Practical tip: Care for an Orchid Plant your orchid receives strong afternoon sun through an unobstructed window, move it slightly farther away or filter the light with a sheer curtain rather than putting it in a completely dark location.
Image Suggestion: A healthy Phalaenopsis orchid positioned near an east-facing window with bright filtered light.
2. Choose the Correct Orchid Potting Mix
One of the most common orchid-care mistakes is planting an orchid in ordinary garden soil or standard houseplant potting soil.
Many popular orchids are epiphytes. Their roots are adapted to growing in an airy environment where rain or moisture arrives periodically but excess water drains away quickly.
A typical orchid mix may contain:
- Chunky bark
- Sphagnum moss
- Perlite
- Horticultural charcoal
- Other coarse, moisture-managing materials
The ideal mix depends on the orchid and your indoor environment.
For example, a home with dry air may require a mix that holds moisture somewhat longer, while a humid home with limited airflow may benefit from a more open, fast-draining medium.
The goal is not simply maximum drainage. The growing medium should provide enough moisture for the plant while leaving sufficient air around the roots.
3. Water the Orchid Thoroughly, but Don’t Keep It Soaked
Watering is where many beginners struggle.
There is no universally correct rule such as watering every seven days. The orchid’s potting medium, temperature, humidity, pot size, season, and root condition all affect how quickly it dries.
Instead of watering according to a fixed calendar, check the plant.
For a typical Phalaenopsis orchid:
- Examine the roots if they are visible through a clear pot.
- Check whether the growing medium has become noticeably drier.
- Water thoroughly so the medium is evenly moistened.
- Allow excess water to drain completely.
- Return the orchid to its normal location.
Healthy, hydrated Phalaenopsis roots commonly appear green after watering and become silvery or grayish as they dry. This makes a transparent orchid pot particularly useful for beginners.
Avoid allowing the orchid to sit in a decorative container full of standing water.
4. Avoid Water Sitting in the Crown
A less obvious but important watering mistake occurs when water remains trapped between the leaves at the center of the plant.
The central growing point, often called the crown, can be vulnerable to rot when water repeatedly sits there, particularly in cool conditions or where airflow is poor.
If water collects in the crown:
- Gently remove the excess with a soft paper towel.
- Improve airflow around the plant.
- Water the growing medium rather than repeatedly pouring water over the leaves.
This does not mean orchid leaves must never get wet. The concern is prolonged moisture trapped in the crown rather than brief contact with water.
How Often Should You Water an Orchid?
There is no single watering interval that works for every orchid.
A common indoor Phalaenopsis may need watering roughly every one to two weeks under some conditions, but this can change substantially. A warm, bright room can dry the potting mix faster than a cool, dim room.
Use the condition of the plant and medium as your guide.
Water sooner when:
- The potting medium has dried substantially.
- The roots are mostly silvery or gray.
- The pot feels noticeably light.
- The plant is growing actively and conditions are warm and bright.
Wait longer when:
- The medium is still wet.
- Roots remain consistently green and hydrated.
- The room is cool or poorly ventilated.
- The potting mix is staying wet for an unusually long time.
The biggest mistake is often not watering too infrequently—it is repeatedly adding water before the roots have had enough access to air.
What Type of Water Is Best for Orchids?
Many orchids can tolerate ordinary tap water, but water quality can matter over time.
Care for an Orchid Plant your tap water is very hard or contains substantial dissolved minerals, mineral deposits may accumulate in the growing medium or around the roots.
Depending on local water quality, growers may use:
- Filtered water
- Rainwater
- Distilled water
- Tap water that is otherwise suitable for the plant
Care for an Orchid Plant using purified or distilled water for a long period, remember that orchids also require nutrients, so proper fertilization becomes important.
Rather than assuming one water source is universally best, pay attention to your plant, local water quality, and mineral buildup around the pot.
How Much Humidity Does an Orchid Need?
Many popular orchids appreciate moderate to moderately high humidity because they originate from environments with more atmospheric moisture than typical heated or air-conditioned homes.
However, increasing humidity without improving airflow can create another problem.
A good orchid environment balances:
Humidity + airflow + appropriate watering
You can increase humidity by:
- Grouping compatible plants together
- Using a room humidifier
- Keeping the orchid away from drying HVAC vents
- Maintaining reasonable ambient humidity in the room
A pebble tray can modestly increase moisture immediately around a plant, but it should not be used in a way that leaves the orchid pot sitting directly in water.
Avoid turning a small enclosed space into a constantly wet environment. Poor airflow combined with persistent moisture can encourage disease problems.
What Temperature Is Best for Orchids?
Popular Phalaenopsis orchids generally perform well at comfortable indoor temperatures.
Try to avoid placing them:
- Directly beside heating vents
- Against very cold windows during freezing weather
- In strong drafts
- Near frequently opened exterior doors
- In locations with extreme day-to-night temperature swings
A slight difference between daytime and nighttime temperatures can be useful for some orchids, particularly when encouraging flowering, but extreme temperature changes are unnecessary for ordinary indoor care.
How to Fertilize an Orchid
Orchids need nutrients, but heavy feeding can damage roots and create salt buildup.
Use a fertilizer formulated for orchids or a suitable balanced fertilizer according to its label instructions. During active growth, many growers fertilize regularly at an appropriately diluted strength rather than applying large amounts infrequently.
A practical approach is:
- Water or moisten the roots appropriately.
- Apply diluted fertilizer according to the product directions.
- Avoid concentrating fertilizer directly against dry roots.
- Periodically flush the growing medium thoroughly with water if appropriate for the potting setup to help reduce accumulated salts.
Do not assume that more fertilizer means more flowers. Excess fertilizer can cause root and foliage problems instead.
When and How to Repot an Orchid
Orchids generally do not need frequent repotting simply because they have been in the same pot for a certain number of months.
Repot when there is a genuine reason, such as:
- The potting medium has broken down.
- The medium stays wet for too long.
- Roots are unhealthy or rotting.
- The plant has significantly outgrown its container.
- The existing pot no longer provides suitable drainage or stability.
For many orchids, repotting after flowering is convenient, but the best timing also depends on the plant’s condition.
How to Repot a Phalaenopsis Orchid
Remove the orchid carefully and inspect the roots.
Healthy roots are generally firm rather than mushy. Dead or severely damaged roots can be removed using clean, sterilized cutting tools.
Then:
- Select a pot with adequate drainage.
- Choose a fresh orchid-appropriate growing medium.
- Position the plant so the crown is not buried.
- Arrange the roots naturally rather than forcing them tightly into the container.
- Fill around the roots with the growing medium.
- Keep the plant stable without packing the medium excessively tightly.
One important mistake is choosing an oversized pot. A very large container can hold moisture around the roots for too long, increasing the risk of root problems.
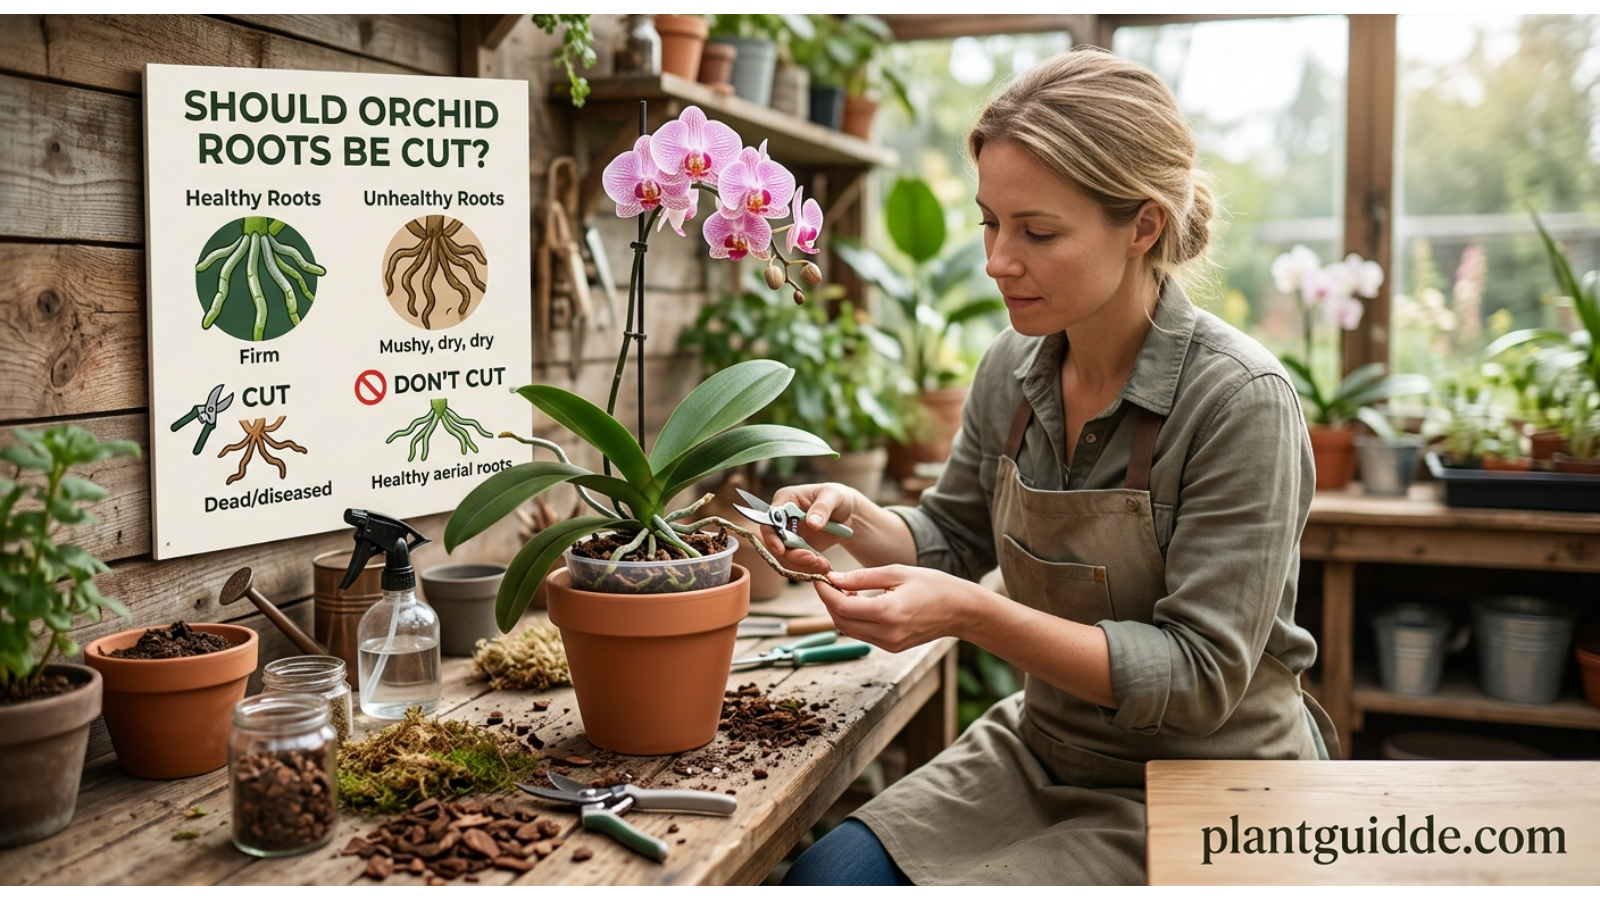
Should Orchid Roots Be Cut?
No—not every visible orchid root should be cut.
Orchid roots may grow outside the pot, and this is not automatically a sign that something is wrong. Aerial roots are normal for many epiphytic orchids.
Cut roots when they are genuinely dead, severely damaged, or rotting, rather than cutting healthy roots simply because they look unusual.
Healthy roots can be:
- Firm
- Plump
- Green when hydrated
- Silvery or gray when drier
Rotten roots tend to be:
- Brown or black
- Soft
- Mushy
- Hollow or collapsing
The distinction is important because unnecessarily removing healthy roots can reduce the plant’s ability to absorb water and nutrients.
What to Do After Orchid Flowers Fall Off
Falling flowers do not necessarily mean that your orchid is dying.
Orchid flowers naturally fade after their blooming period. Once flowering finishes, inspect the flower spike and the overall plant before deciding what to do.
Care for an Orchid Plant the spike remains green and healthy, some growers leave it in place because a Phalaenopsis can sometimes produce additional flowers or branches from nodes on the spike.
Care for an Orchid Plant the spike has turned brown or dried completely, it can generally be cut back with a clean tool.
Continue normal care after flowering:
- Maintain suitable light.
- Continue appropriate watering.
- Keep feeding reasonable.
- Avoid suddenly changing the plant’s environment.
A common mistake is treating the end of flowering as a signal to dramatically alter watering or light. The orchid still needs consistent care while it prepares its next growth cycle.
Why Are My Orchid Leaves Turning Yellow?
Yellow leaves can have several causes, so the pattern matters.
Natural Aging
If one of the oldest lower leaves gradually turns yellow while the rest of the plant looks healthy, natural leaf aging may be responsible.
Too Much Water
Persistent yellowing combined with soft roots, wet growing medium, or poor drainage can indicate excessive moisture around the roots.
Too Little Light
Insufficient light can weaken growth and reduce flowering, although leaf color alone is not enough to diagnose the problem.
Sudden Environmental Stress
Changes in temperature, light, watering, or location can also cause an orchid to decline.
Do not immediately increase fertilizer whenever leaves turn yellow. First inspect the roots, light conditions, watering pattern, and growing medium.
Why Are My Orchid Leaves Wrinkled?
Wrinkled or limp orchid leaves can indicate that the plant is not maintaining adequate water balance.
Possible causes include:
- Dehydrated roots
- Root rot
- Severe underwatering
- Damaged roots
- Poor growing-medium conditions
This is an important diagnostic point: watering more is not always the solution.
If the roots have rotted, adding more water cannot fix the problem. The plant may look thirsty because its remaining healthy roots cannot supply enough moisture to the leaves.
Inspect the roots before simply increasing watering frequency.
Why Are Orchid Leaves Turning Brown?
Brown areas can result from several problems.
Possible causes include:
- Excessive direct sunlight
- Low humidity combined with environmental stress
- Mineral or fertilizer buildup
- Physical damage
- Disease
- Severe dehydration
Brown, dry patches on the side of a leaf exposed to strong sun suggest a different problem from a soft, spreading brown area associated with excess moisture.
Look at the location, texture, and progression of the damage before deciding what to change.
Why Is My Orchid Not Blooming?
A mature orchid that refuses to flower is often responding to its environment rather than simply needing more fertilizer.
Consider these factors:
Insufficient Light
An orchid may survive in a dim room but lack the energy required for reliable flowering.
Immature or Recovering Plant
Recently purchased orchids may need time to adjust after flowering or transportation.
Incorrect Temperature Conditions
Some orchids respond to changes in day and night temperatures as part of their flowering cycle.
Poor Overall Health
An orchid struggling with root damage, pests, or severe environmental stress may prioritize survival and leaf or root recovery rather than flowering.
Before buying a bloom stimulant, improve the fundamentals: light, roots, watering, nutrition, and temperature.
Common Orchid Care Mistakes to Avoid
Using Ordinary Potting Soil
Dense soil can restrict airflow around roots that are adapted to an open growing environment.
Watering on a Fixed Schedule
A calendar cannot account for changing temperature, humidity, light, and potting-medium conditions.
Leaving the Pot in Standing Water
Continuous water around the roots can reduce oxygen availability and encourage root problems.
Cutting Healthy Aerial Roots
Roots outside the pot are not automatically unhealthy.
Giving Too Much Sun
Bright light is beneficial, but harsh direct sunlight can scorch leaves.
Keeping the Plant Too Dark
Avoiding sunburn by placing the orchid in a dim corner can create the opposite problem: weak growth and poor flowering.
Overfertilizing
More fertilizer is not a shortcut to more flowers.
Ignoring the Roots
The leaves tell you something, but the roots often reveal the underlying problem.
A Simple Orchid Care Routine for Beginners
If you want an easy routine, use this checklist rather than trying to memorize a strict watering calendar.
Weekly check:
- Look at the leaves for unusual yellowing, spots, or wilting.
- Check the visible roots.
- Feel or inspect the growing medium.
- Make sure water is not collecting in the decorative container.
- Check that the plant is receiving adequate filtered light.
- Look for insects or sticky residue.
When watering is actually needed:
- Water thoroughly.
- Let excess water drain completely.
- Empty any outer container that collects water.
- Avoid leaving water trapped in the crown.
Every few months:
- Inspect the condition of the growing medium.
- Check for mineral buildup.
- Look for overcrowded or unhealthy roots.
- Reassess whether the orchid is receiving enough light.
This approach is much more reliable than automatically watering every Sunday.
How to Tell Whether Your Orchid Is Healthy
A healthy orchid does not need to look perfect.
Look for:
- Firm leaves
- New root growth
- Healthy roots
- Stable or new foliage
- Appropriate green or silvery root coloration depending on hydration
- New flower spikes when conditions are favorable
Do not panic over:
- An occasional aging lower leaf
- Aerial roots growing outside the pot
- Flowers naturally fading
- A temporary pause in flowering
Instead, pay attention to patterns. A single old leaf turning yellow is very different from multiple leaves yellowing while the pot remains constantly wet.
Orchid Care by Season
Spring and Summer
As light and temperatures increase, your orchid may use water more quickly. Monitor the growing medium rather than automatically increasing watering.
Protect the plant from intense direct afternoon sunlight if the leaves show signs of scorching.
Fall and Winter
Lower light and cooler temperatures can slow water consumption. The potting medium may therefore remain wet longer.
This is when fixed watering schedules become particularly risky. If you continue watering at the same frequency despite slower drying, root problems can develop.
Keep orchids away from cold drafts while maintaining reasonable airflow.
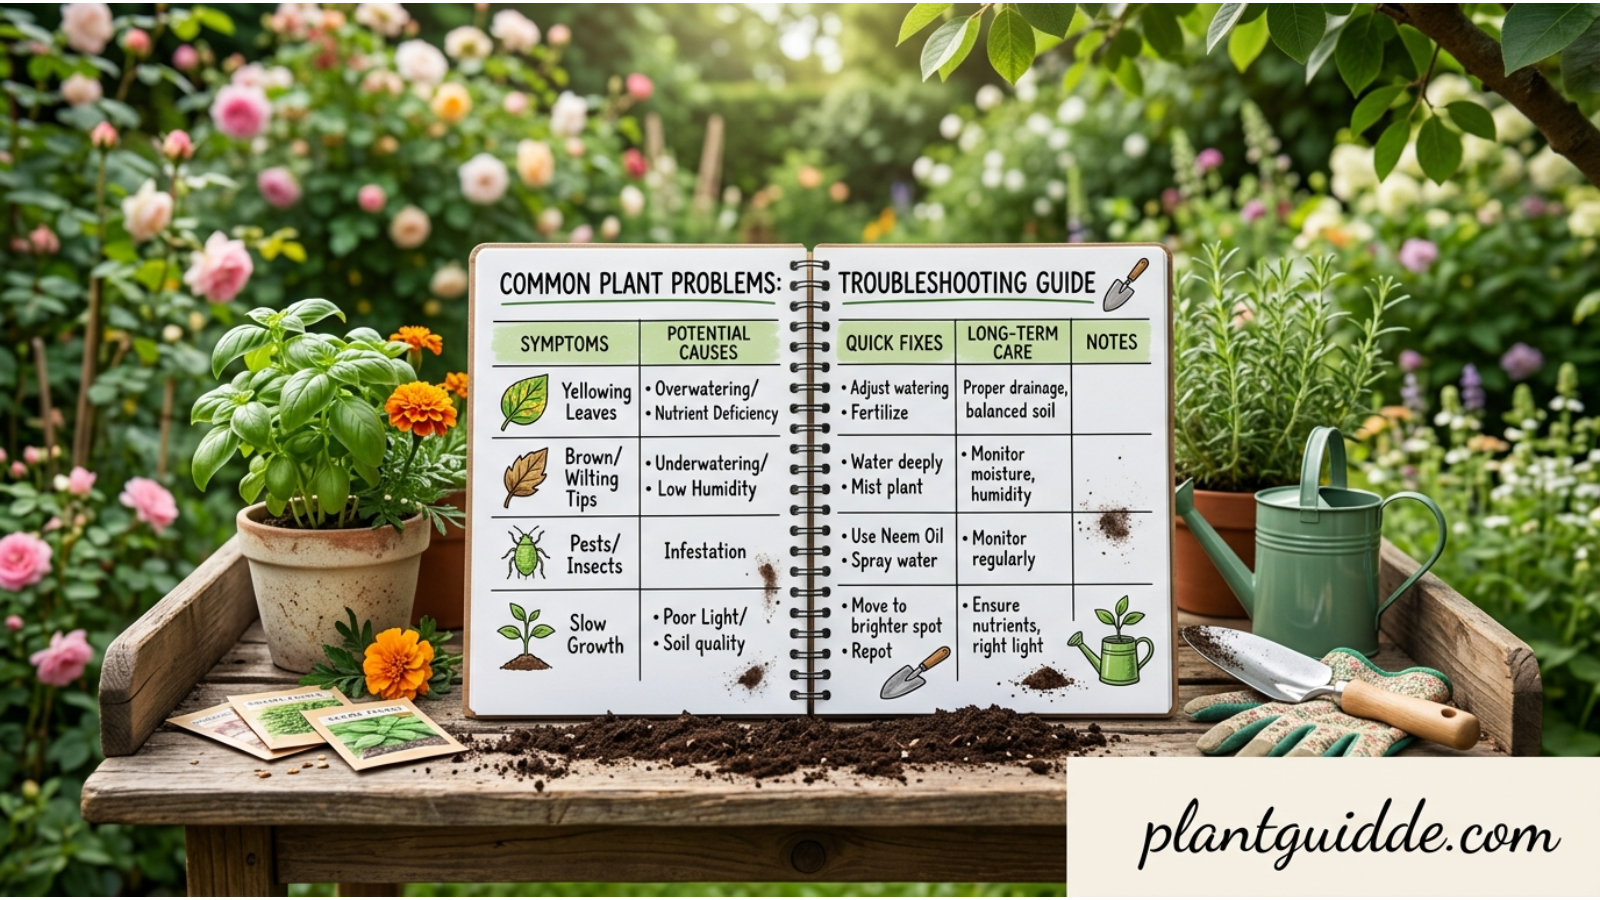
A Practical Troubleshooting Table
| Symptom | Possible Cause | What to Check First |
|---|---|---|
| Yellow lower leaf | Natural aging or stress | Whether new growth remains healthy |
| Several yellow leaves | Excess moisture, root issues, stress | Roots and growing medium |
| Wrinkled leaves | Dehydration or damaged roots | Root condition |
| Brown sunken patches | Sunburn or damage | Light exposure |
| No flowers | Insufficient light, season, plant condition | Light and overall health |
| Mushy roots | Excess moisture or poor drainage | Pot and growing medium |
| Dry, crispy tips | Environmental stress, water quality, humidity | Water quality and room conditions |
| Flowers dropping | Normal flowering cycle or environmental stress | Overall plant condition |
| Many aerial roots | Often normal growth | Root firmness and health |
Remember that symptoms can overlap. The best diagnosis comes from considering several clues together rather than matching one symptom to one cause.
Can You Grow an Orchid in a Clear Pot?
Yes. A clear plastic orchid pot can be particularly useful for beginners because it allows you to observe the roots and moisture conditions without disturbing the plant.
You can often see:
- Root color
- Root growth
- Water droplets or condensation
- How quickly the growing medium dries
- Whether roots are becoming crowded
A decorative outer pot can then be used for appearance, provided it does not prevent proper drainage.
The clear pot is not essential for every orchid, but it is a useful monitoring tool.
Where Should You Put an Orchid in Your Home?
A bright room near a suitable window is usually better than choosing a location based purely on appearance.
Good locations may include:
- Near an east-facing window
- Near a bright filtered south-facing window
- Near a west-facing window with protection from intense afternoon sun
Avoid locations immediately beside:
- Heating vents
- Air-conditioning outlets
- Very cold glass during winter
- Dark corners
- Frequently opened exterior doors
If an orchid is healthy but rarely flowers, reconsider the amount and quality of light it receives before making complicated changes to its fertilizer routine.
FAQs:
How often should I water an orchid plant?
Water when the growing medium has dried sufficiently for your orchid and environment rather than following a fixed weekly schedule. For many indoor Phalaenopsis orchids, this may be around every one to two weeks, but conditions can make the interval shorter or longer.
Should I water an orchid with ice cubes?
Using ice is unnecessary and is not the best general watering method. Orchids benefit from appropriate moisture reaching their roots, followed by adequate drainage. Room-temperature water applied properly is a simpler approach.
Do orchids need direct sunlight?
Most popular indoor orchids prefer bright indirect or filtered light. Gentle morning sun can be suitable, while intense midday or afternoon sunlight through glass may scorch the leaves.
Why are my orchid roots turning white or silver?
For many Phalaenopsis orchids, roots commonly become silvery or gray as they dry and turn green when hydrated. Root color can therefore be a useful clue when deciding whether watering is needed.
How do I get my orchid to bloom again?
Start with the fundamentals. Give it adequate bright filtered light, maintain healthy roots, water appropriately, provide reasonable nutrition, and keep temperatures reasonably stable. For some Phalaenopsis orchids, suitable day-to-night temperature changes can also help initiate flowering.
Final Thoughts
Successful orchid care is less complicated when you focus on what the plant is actually showing you. Give the orchid appropriate light, keep its roots in a well-aerated medium, water thoroughly but allow excess moisture to drain, maintain reasonable humidity and airflow, and avoid dramatic environmental changes.
Most importantly, don’t diagnose an orchid from one symptom alone. Yellow leaves, wrinkled foliage, brown patches, and poor flowering can have several causes. Check the roots, growing medium, light, watering habits, and environment together.
If you’re growing a Phalaenopsis orchid, start by getting light and root health right. Once those two foundations are working, watering, fertilizing, and encouraging future blooms become much easier to manage.

Asad Mumtaz is a dedicated plant enthusiast and gardening writer with a passion for helping people care for their plants successfully. He specializes in plant care guides, indoor gardening, and practical growing tips for all skill levels. His content focuses on making gardening simple, enjoyable, and rewarding. Through his work, Asad shares reliable advice to help readers create thriving green spaces.